Get Perfect AI Voice Clones: The Ultimate Guide to Recording Your Source Audio
You've heard about AI voice cloning. You're excited to try it. You upload your audio sample, generate your first voiceover, and... it sounds robotic, unnatural, or just plain wrong.
What happened?
The truth is: garbage in, garbage out. The quality of your AI voice clone is directly tied to the quality of your source audio sample. Even the most advanced AI can't work miracles with poor-quality recordings.
This guide will show you exactly how to record the perfect audio sample for AI voice cloning, ensuring professional, natural-sounding results every time.
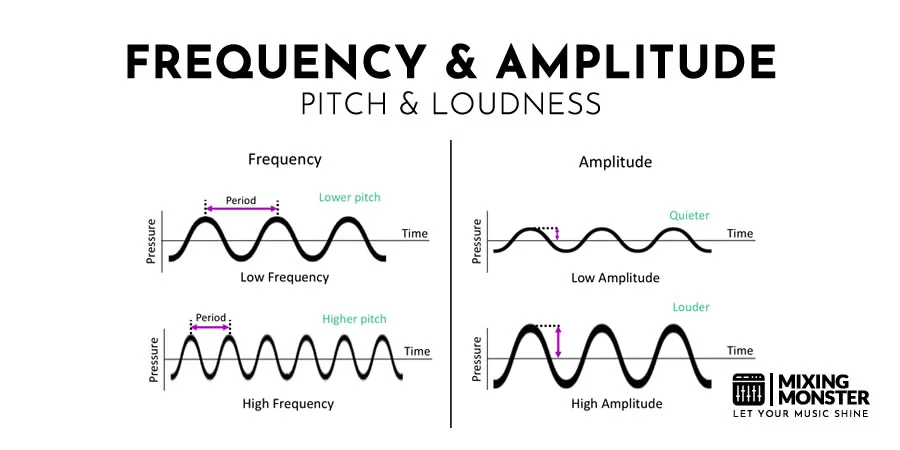
Why Audio Quality Matters for Voice Cloning
AI voice cloning works by analyzing your voice sample to learn:
- Tone and pitch characteristics
- Speaking rhythm and pace
- Emotional range and expression
- Pronunciation patterns
- Unique vocal qualities
If your sample is filled with background noise, has inconsistent volume, or poor recording quality, the AI will learn and replicate those flaws. The result? A voice clone that sounds:
- Muffled or unclear
- Robotic or unnatural
- Inconsistent in quality
- Missing your unique vocal characteristics
The Golden Rules of Voice Sample Recording
Rule #1: Environment is Everything
Choose the Right Location:
- ✅ Quiet room with minimal echo
- ✅ Away from traffic, appliances, and HVAC systems
- ✅ Soft furnishings (carpets, curtains, furniture) to absorb sound
- ❌ Bathrooms, kitchens, or empty rooms (too much echo)
- ❌ Near windows, doors, or busy areas
- ❌ Rooms with hard surfaces (tile, hardwood, bare walls)
Pro Tip: Record in a closet full of clothes for instant sound dampening!
Rule #2: Equipment Matters (But Not as Much as You Think)
Minimum Requirements:
- Smartphone with decent microphone (iPhone 11+, Samsung S10+)
- Quiet environment
- Stable recording position
Recommended Setup:
- USB microphone ($50-150): Blue Yeti, Audio-Technica AT2020
- Pop filter ($10-20)
- Microphone stand or stable surface
- Headphones for monitoring
Professional Setup:
- XLR microphone ($200-500): Shure SM7B, Rode NT1
- Audio interface ($100-300)
- Acoustic treatment panels
- Professional recording software
Reality Check: A $50 USB mic in a quiet room will outperform a $500 mic in a noisy environment every time.
Rule #3: Recording Technique
Microphone Positioning:
- Distance: 6-8 inches from your mouth
- Angle: Slightly off-axis (not directly in front) to reduce plosives
- Height: At mouth level
- Consistency: Maintain the same position throughout
Speaking Technique:
- Speak naturally - don't try to sound "professional"
- Maintain consistent volume
- Use your normal speaking pace
- Include natural pauses and breathing
- Vary your tone and emotion
What to Avoid:
- ❌ Speaking too close (causes distortion and plosives)
- ❌ Speaking too far (sounds distant and echoey)
- ❌ Moving around while recording
- ❌ Shouting or whispering
- ❌ Monotone delivery
Step-by-Step: Recording Your Perfect Voice Sample
Step 1: Prepare Your Environment
15 Minutes Before Recording:
- Turn off all unnecessary electronics
- Close windows and doors
- Turn off HVAC/fans (if possible)
- Silence phones and notifications
- Inform others you're recording
Room Treatment Quick Fixes:
- Hang blankets on walls
- Place pillows around recording area
- Use a makeshift vocal booth (cardboard box lined with foam)
- Record under a blanket fort (seriously, it works!)

Step 2: Set Up Your Equipment
Microphone Setup:
- Position mic 6-8 inches from mouth
- Angle slightly off-axis (30-45 degrees)
- Ensure stable mounting (no wobbling)
- Test recording levels
Recording Levels:
- Peak levels: -12dB to -6dB (avoid clipping)
- Average levels: -18dB to -12dB
- Use headphones to monitor
- Do a test recording first
Software Settings:
- Sample rate: 44.1kHz or 48kHz
- Bit depth: 24-bit (if available)
- Format: WAV or FLAC (lossless)
- Mono recording (not stereo)
Step 3: What to Say (Script Guidelines)
Ideal Sample Length:
- Minimum: 30 seconds
- Recommended: 1-2 minutes
- Optimal: 3-5 minutes
- Maximum: 10 minutes
Content Requirements:
Include Variety:
- Different sentence types (statements, questions, exclamations)
- Various emotions (neutral, happy, serious, excited)
- Different pacing (slow, normal, fast)
- Natural pauses and breathing
- Your typical speaking style
Sample Script Template:
[Neutral tone]
"Hello, this is a voice sample for AI cloning. I'm speaking in my natural voice, at my normal pace."

[Slightly excited]
"I'm really excited about this technology! It's amazing what AI can do these days."

[Serious/informative]
"When recording a voice sample, it's important to maintain consistent quality throughout. Make sure your environment is quiet and your microphone is positioned correctly."

[Conversational]
"You know, I've been thinking about how this could help content creators. Imagine being able to generate voiceovers in seconds instead of hours."

[Question]
"What would you do with an AI clone of your voice? The possibilities are endless, aren't they?"

[Varied pacing - slow]
"Sometimes... we need to speak... more slowly... for emphasis."

[Varied pacing - fast]
"And other times we speak quickly because we're excited or running out of time!"

[Natural conclusion]
"Well, that's my voice sample. I hope it captures my unique speaking style and characteristics. Thanks for listening!"
Step 4: Recording Best Practices
The Recording Process:
-
Warm Up Your Voice (5 minutes)
- Hum gently
- Do vocal exercises
- Read your script aloud once
- Drink water (avoid dairy before recording)
-
Do a Test Recording (2 minutes)
- Record 30 seconds
- Listen back with headphones
- Check for background noise
- Adjust levels if needed
-
Record Your Sample (5-10 minutes)
- Take a deep breath
- Speak naturally and confidently
- Don't stop for small mistakes
- Maintain consistent energy
- Record in one continuous take if possible
-
Record Multiple Takes (Optional)
- Do 2-3 complete recordings
- Choose the best one
- Or combine the best parts
Common Mistakes to Avoid:
- ❌ Recording when tired or sick
- ❌ Eating or drinking (except water) right before
- ❌ Recording in one emotion/tone only
- ❌ Speaking too formally or unnaturally
- ❌ Stopping and starting frequently
Step 5: Post-Recording Cleanup
Basic Cleanup (Recommended):
- Trim silence at beginning and end
- Normalize audio to -3dB peak
- Remove obvious clicks or pops
- Export as high-quality MP3 (320kbps) or WAV
Advanced Cleanup (If Needed):
- Light noise reduction (be careful not to overdo it)
- De-essing (reduce harsh "s" sounds)
- Compression (even out volume)
- EQ (subtle enhancement only)
Warning: Don't over-process! The AI needs to learn your natural voice, including minor imperfections. Heavy processing can make your voice clone sound artificial.
Troubleshooting Common Audio Problems
Problem 1: Background Noise
Symptoms:
- Hissing, humming, or buzzing
- Traffic or appliance sounds
- Echo or reverb
Solutions:
- ✅ Use noise reduction software (Audacity, Adobe Audition)
- ✅ Re-record in a quieter environment
- ✅ Use a noise gate during recording
- ✅ Record at quieter times of day
AI-Powered Solutions:
- Krisp.ai (real-time noise cancellation)
- Adobe Podcast Enhance (one-click cleanup)
- Descript Studio Sound (automatic enhancement)
Problem 2: Inconsistent Volume
Symptoms:
- Some words loud, others quiet
- Fading in and out
- Clipping or distortion
Solutions:
- ✅ Maintain consistent distance from mic
- ✅ Use a pop filter
- ✅ Apply gentle compression
- ✅ Normalize audio levels
Problem 3: Plosives (P, B, T sounds)
Symptoms:
- Popping sounds on "P" and "B"
- Harsh bursts of air
Solutions:
- ✅ Use a pop filter
- ✅ Position mic slightly off-axis
- ✅ Speak across the mic, not directly into it
- ✅ Use a de-esser plugin
Problem 4: Room Echo/Reverb
Symptoms:
- Hollow, distant sound
- Multiple reflections
- Unclear speech
Solutions:
- ✅ Add soft furnishings to room
- ✅ Record in smaller space
- ✅ Use acoustic panels or blankets
- ✅ Get closer to microphone
Problem 5: Mouth Clicks and Smacks
Symptoms:
- Clicking sounds between words
- Lip smacking noises
Solutions:
- ✅ Stay hydrated (drink water)
- ✅ Avoid dairy products before recording
- ✅ Use a de-clicker plugin
- ✅ Edit out manually if needed
Free Tools for Audio Cleanup
Recording Software
Free Options:
-
Audacity (Windows, Mac, Linux)
- Full-featured audio editor
- Noise reduction built-in
- Easy to learn
-
GarageBand (Mac only)
- User-friendly interface
- Good quality recording
- Basic editing tools
-
Ocenaudio (Windows, Mac, Linux)
- Simple and fast
- Real-time preview of effects
- Good for beginners
AI-Powered Cleanup Tools
Free Tiers Available:
-
Adobe Podcast Enhance (free, web-based)
- One-click audio enhancement
- Removes background noise
- Makes audio sound studio-quality
-
Krisp (free tier available)
- Real-time noise cancellation
- Works with any recording software
- Removes background voices
-
Descript (free tier available)
- Studio Sound feature
- Automatic audio enhancement
- Transcription included
Quality Checklist: Is Your Sample Ready?
Before uploading your voice sample, check:
Technical Quality:
- No background noise or hum
- Consistent volume throughout
- No clipping or distortion
- Clear and intelligible speech
- Minimal echo or reverb
- Sample rate: 44.1kHz or higher
- Format: MP3 (320kbps) or WAV
Content Quality:
- 1-5 minutes in length
- Natural speaking style
- Varied emotions and tones
- Different sentence types
- Consistent pacing
- Includes pauses and breathing
- Represents your typical voice
If you checked all boxes: Your sample is ready! Upload and create your voice clone.
If you missed some: Review the relevant sections above and re-record.
Advanced Tips for Professional Results
Tip 1: Record Multiple Samples
Create different samples for different use cases:
- Neutral/Professional: For business content
- Energetic/Excited: For marketing and sales
- Calm/Soothing: For meditation or audiobooks
- Conversational: For podcasts and vlogs
Tip 2: Update Your Voice Clone
Re-record samples periodically:
- Every 6-12 months
- After significant voice changes
- For seasonal content (holiday cheer!)
- To improve quality as you learn
Tip 3: Test and Iterate
After creating your voice clone:
- Generate test voiceovers
- Listen critically
- Identify issues
- Re-record if needed
- Compare results
Tip 4: Professional Voice Sample Service
If you're struggling, consider:
- Hiring a recording studio ($50-200)
- Using a professional voice coach
- Renting studio time for perfect conditions
- One-time investment for long-term quality
Real-World Success Stories
Case Study 1: Podcast Host
Before:
- Recorded on laptop mic
- Noisy home office
- Robotic AI voice clone
After:
- $80 USB mic + pop filter
- Closet recording setup
- Natural, professional voice clone
Result: Podcast production time cut by 75%
Case Study 2: E-Learning Creator
Before:
- Inconsistent audio quality
- Multiple recording sessions
- Voice clone sounded different each time
After:
- Standardized recording process
- Single high-quality master sample
- Consistent voice clone across 100+ modules
Result: Saved $15,000 in re-recording costs
Case Study 3: Content Creator
Before:
- Phone recording in noisy apartment
- Poor voice clone quality
- Gave up on AI voiceovers
After:
- Learned proper recording techniques
- Used free Adobe Podcast Enhance
- Professional-sounding voice clone
Result: Now creates 5x more content with AI voiceovers
Conclusion: Your Voice, Perfected
Recording a high-quality voice sample isn't rocket science, but it does require attention to detail. Follow these guidelines and you'll create an AI voice clone that:
- Sounds natural and authentic
- Captures your unique vocal characteristics
- Produces professional-quality voiceovers
- Saves you time and money
Remember: The 30 minutes you spend recording a perfect voice sample will save you hundreds of hours in the future.
Ready to record your perfect voice sample?
Quick Start Checklist:
- Find a quiet room
- Set up your microphone
- Record 2-3 minutes of varied speech
- Clean up the audio (if needed)
- Upload and create your voice clone
Have questions about recording your voice sample? Drop them in the comments below!